
Quick Start: Everything You Need to Do as a Confession Page Admin
Important: If you need any help at all setting up your confession page just contact us and we can walk you through the whole process step-by-step and help solve any problems you might be having.
- Register your confessions page — submit a registration request with your page name and logo
- Wait for approval — the AnonFess team will review and approve your page, then email you your login details
- Log in to the admin dashboard
- Connect your Facebook page — link the Facebook Page where confessions will be posted
- Optionally connect Instagram — link an Instagram Business account for simultaneous posting
- Share your submission link — share the URL of your confessions submission page so potential “confessors” can find it
- Review pending submissions — approve, edit, or reject confessions as they come in
- Monitor your posting queue — approved confessions post automatically; you can adjust the schedule, reorder or post manually if needed
- Deal with Errors — very occasionally Facebook or Instagram may report an error when trying to post a confession.
- Delete posts if needed — remove a post from Facebook and return it for review, or delete it permanently
- View the Hall of Fame — your top-reacted confessions, ranked and filterable by time period
- Rebuild your old Hall of Fame — if you had a Hall of Fame for your page using a previous Confessions tool you can recover it in this section
- Additional Settings — adjust optional settings such as alert banners, reply links, etc.
- Filters, Content Flags and Warnings — how filters work and how to add additional flags and warnings for potentially sensitive submissions
Detailed Guides
1. Registering Your Confessions Page
Go to the AnonFess registration page on the website and fill in the form:
- Your name and email address
- A password for your admin account
- Your page name — typically your university or society name (e.g. “Durham Confessions” or “Durfess”). Your page name will also be used as the URL of the page (e.g. “Durfess” becomes /durfess/)
- A logo (optional) — a square image that appears on the submission form so people can recognise you, and Hall of Fame
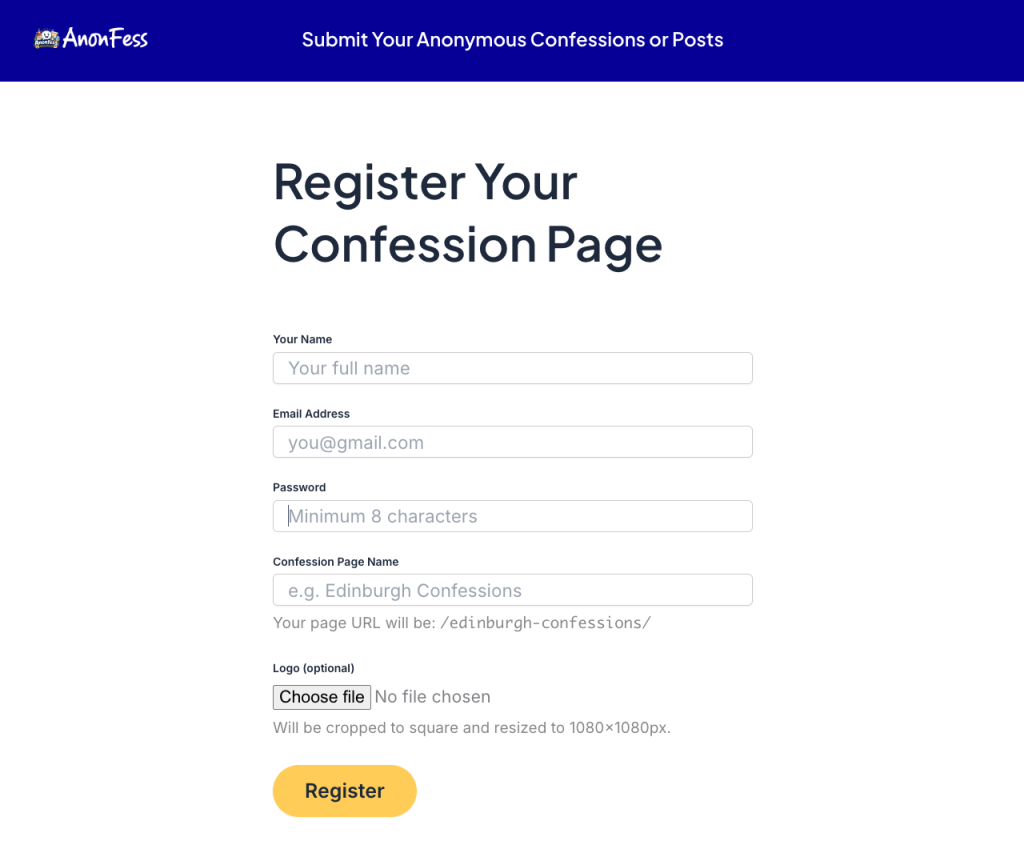
Once you submit, your registration will be reviewed by the AnonFess team. You’ll receive an email when it’s approved. That email will contain your login URL, username, and password.
2. Logging In for the First Time
Use the login link in your approval email. After logging in you’ll be taken directly to your Confession Admin Dashboard.
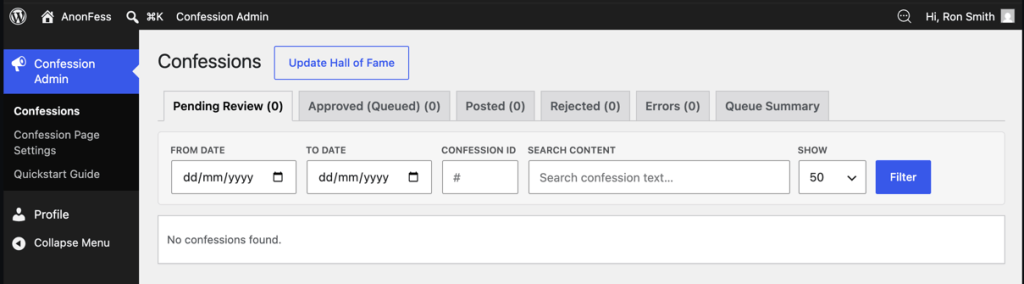
In the sidebar menu you can switch between the Confessions list, Confession Page Settings and this Quickstart Guide. The Confessions list has six tabs, allowing you to manage any submitted confessions for your page.
| Tab | What it shows |
|---|---|
| Pending Review | New submissions waiting for your decision |
| Approved (Queued) | Confessions you’ve approved, waiting to be posted |
| Posted | Confessions that have been published to Facebook |
| Rejected | Confessions you have rejected |
| Errors | Confessions that triggered an error when posting to Facebook/Instagram |
| Queue Summary | Your posting schedule settings |
But before you can use this you’ll need to connect your Facebook Page to the site.
3. Connecting Your Facebook Page
Before any confessions can be posted automatically, you need to link the Facebook Page you manage.
In the dashboard, go to Confession Page Settings (in the left-hand admin menu)
You’ll see a variety of options for your page such as changing the name and logo and adding help text to appear on the Submission page for confessions.
You can set the next post number which determines what the next hashtag (such as #Durfess39961) which will appear in Facebook posts will be. Each Facebook post is allocated a hashtag which contains the page name and a sequential number so each post can be uniquely identified and replied to. If you already have confessions on your page with these hashtags you can set the next hashtag to continue on from where you left off for continuity.
You can also set a temporary alert to show on the Submission page by checking the Show Alert box. You’ll then be able to enter some alert text – for example a note that you’re on holiday and won’t be approving confessions for a week.
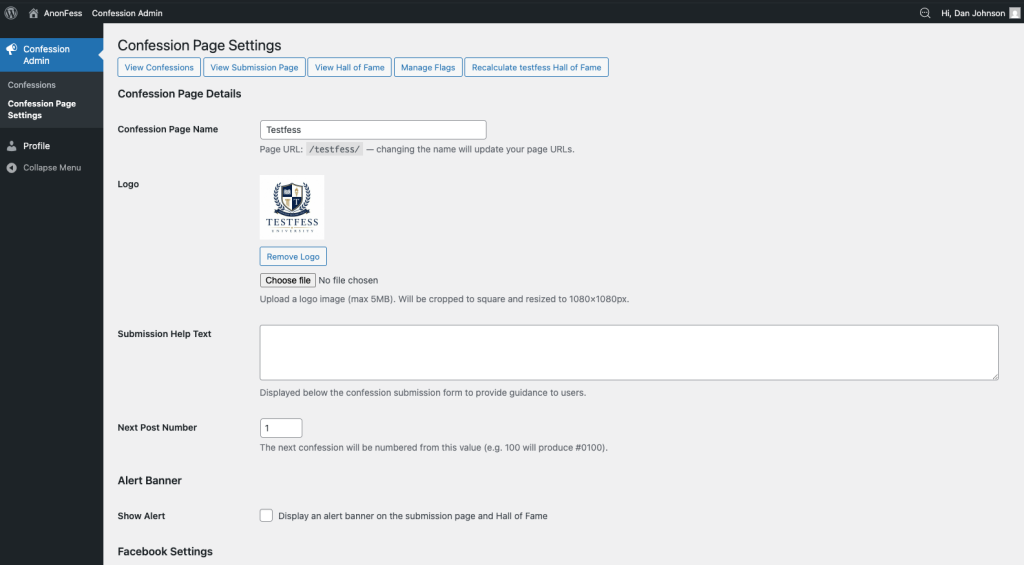
The main thing to set up is your Facebook settings and connection to your Facebook page. Scroll down to this section. You’ll need to be logged in to Facebook as an admin of the Page for the connection to work.
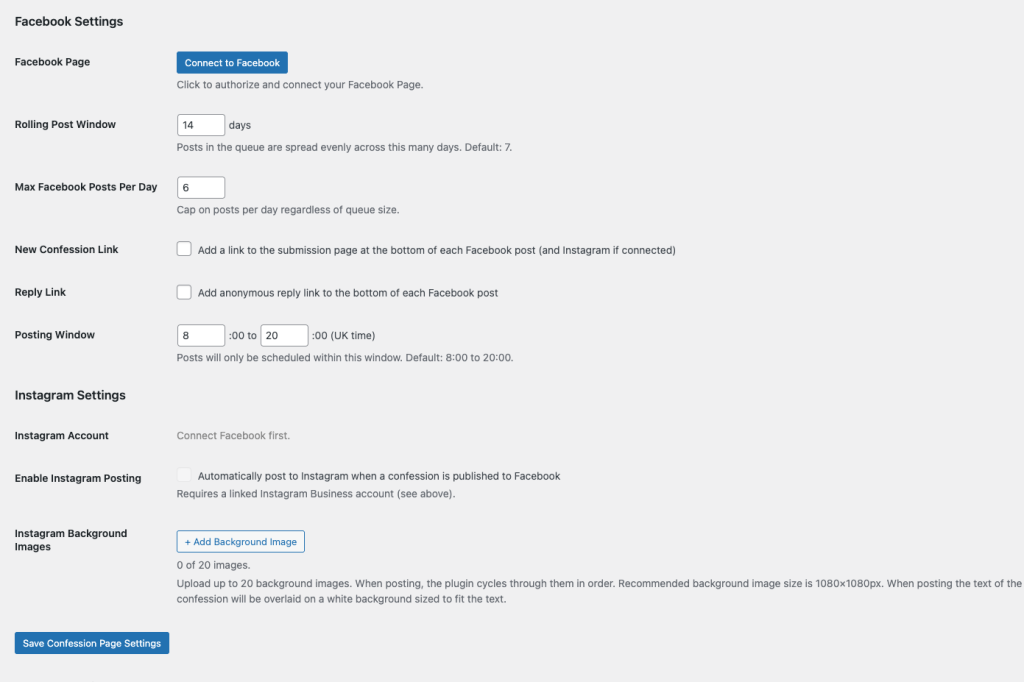
In normal operation you would simply click the Connect to Facebook button and approve the permissions to link AnonFess to your Facebook page and allow it to manage the page, post confessions and read engagements (for the Hall of Fame).
However while we are in initial testing, you will see an extra option to input your own Facebook App ID and App Secret. The instructions for connecting are below. They’re quite long, but in practice, it only takes a minute or so to set up.
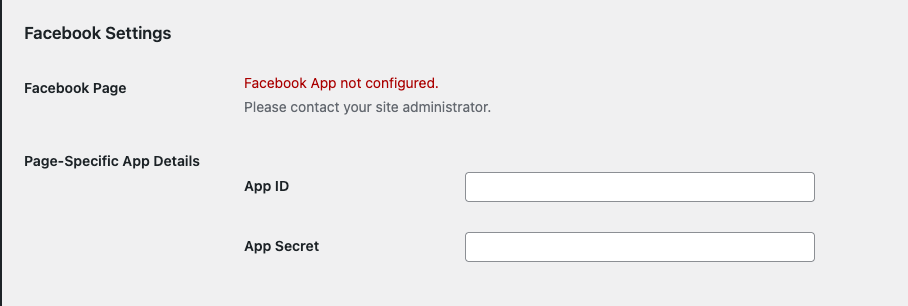
You get this information from setting up your own app on Facebook using the same user that manages your Facebook page.
To set this up, first go to developers.facebook.com when logged in as the Facebook user who manages the Page. Click Get Started then follow the simple steps to verify your account (usually just getting a confirmation text).
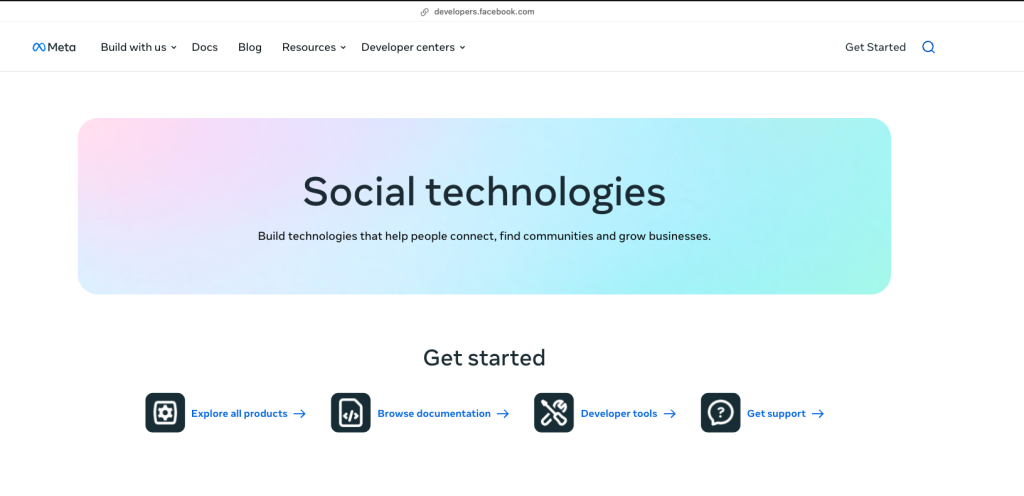
When you’re in, you’ll see this page:
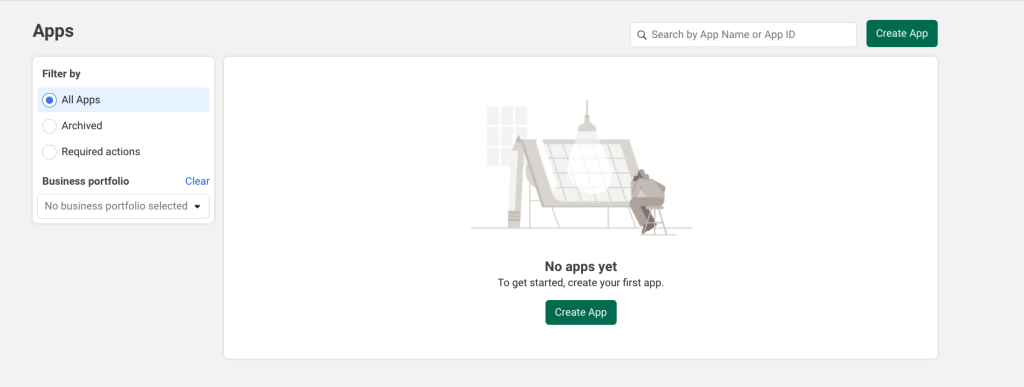
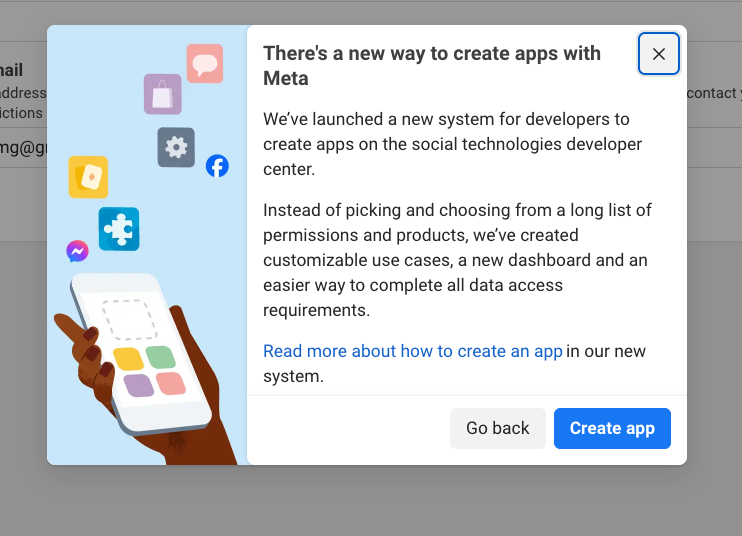
Click Create App and if you see this popup, click Create App again:
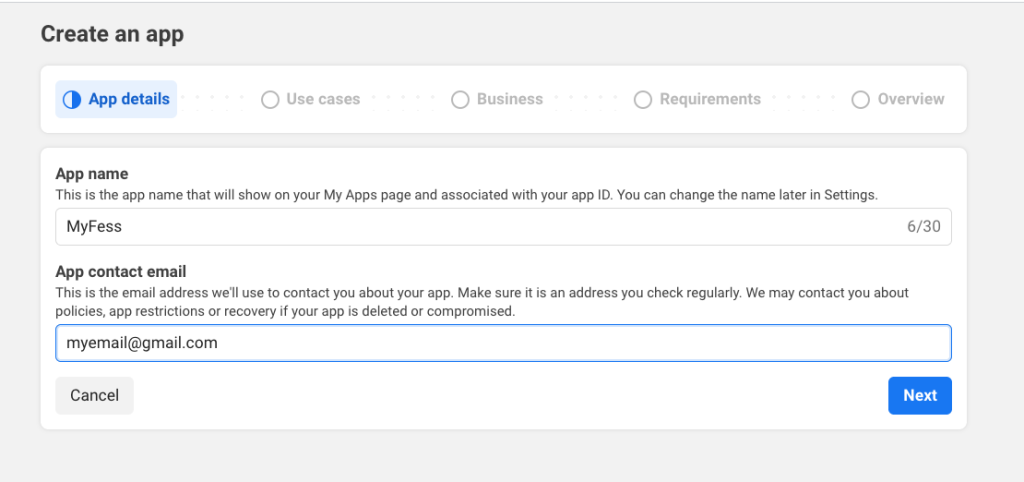
Enter an App name and the email address of the Facebook account you use to manage the page. It doesn’t really matter what App name you use as long as you can recognise it later. The easiest thing is to use the same name as your Confessions Page:
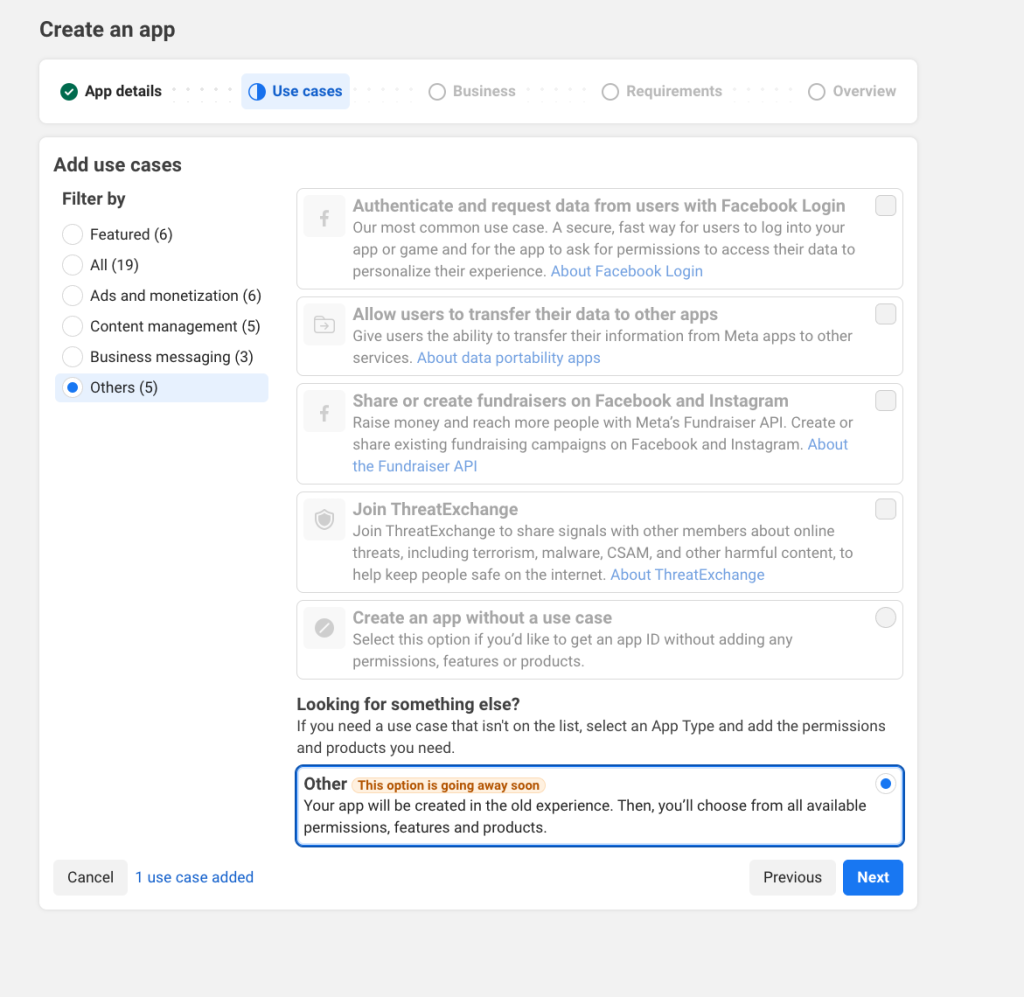
On the next screen click on Others in the left hand sidebar, then Other at the bottom of the list, then Next:
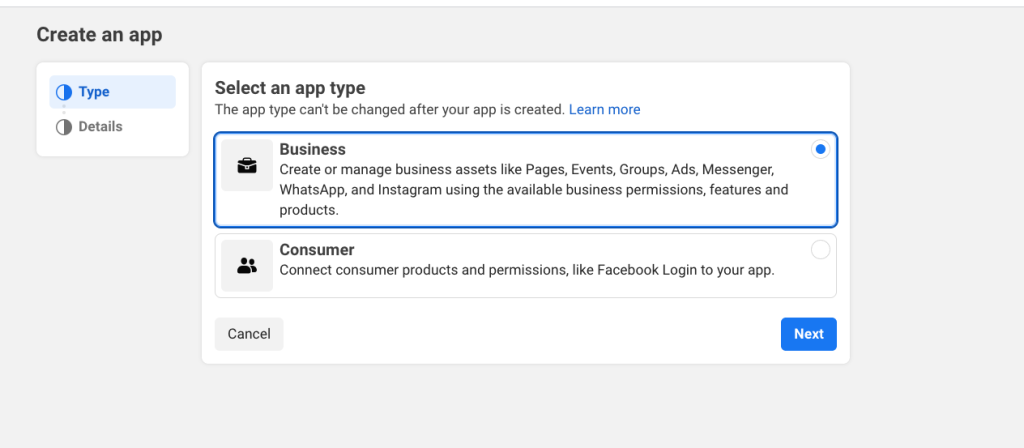
On the next screen click on Business as the App type, then Next:
Then on the next screen just click on Create App – no need to change any of the settings:
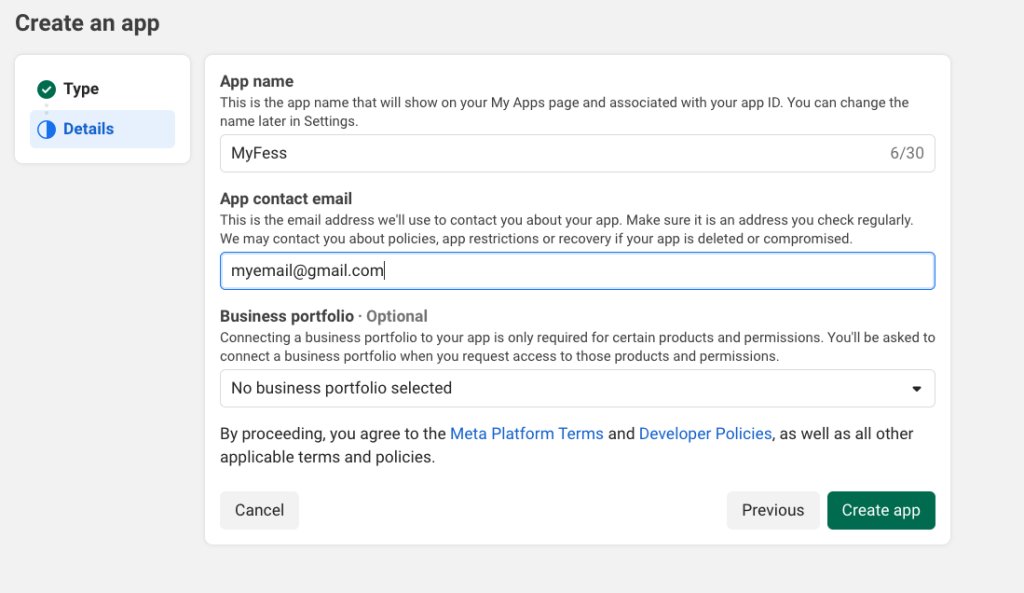
For security, you’ll need to confirm your Facebook password before it creates the app.
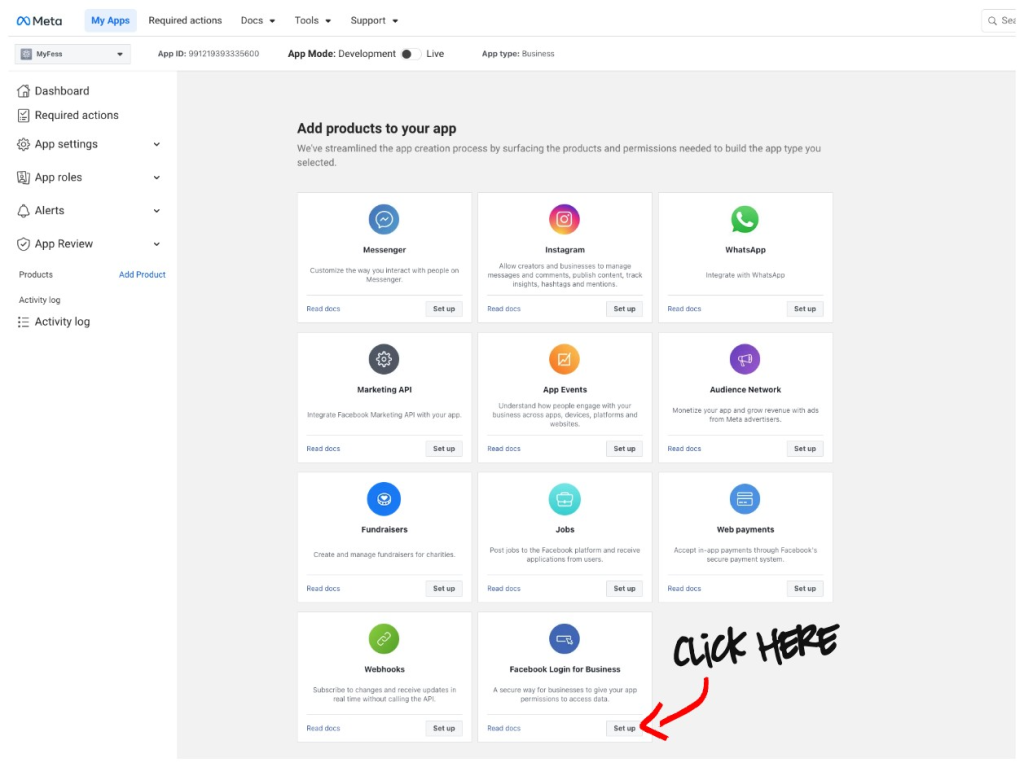
Then on the next page, click on Set Up in the Facebook Login for Business box:
The next setting is important. In the Client OAuth Settings section, paste this exact URL into the Valid OAuth Redirect URIs box: https://anonfess.com/wp-admin/admin-ajax.php?action=fessup_oauth_callback
Then type https://anonfess.com into the Allowed Domains for the JavaScript SDK box at the bottom.
Finally, scroll down and click Save Changes.
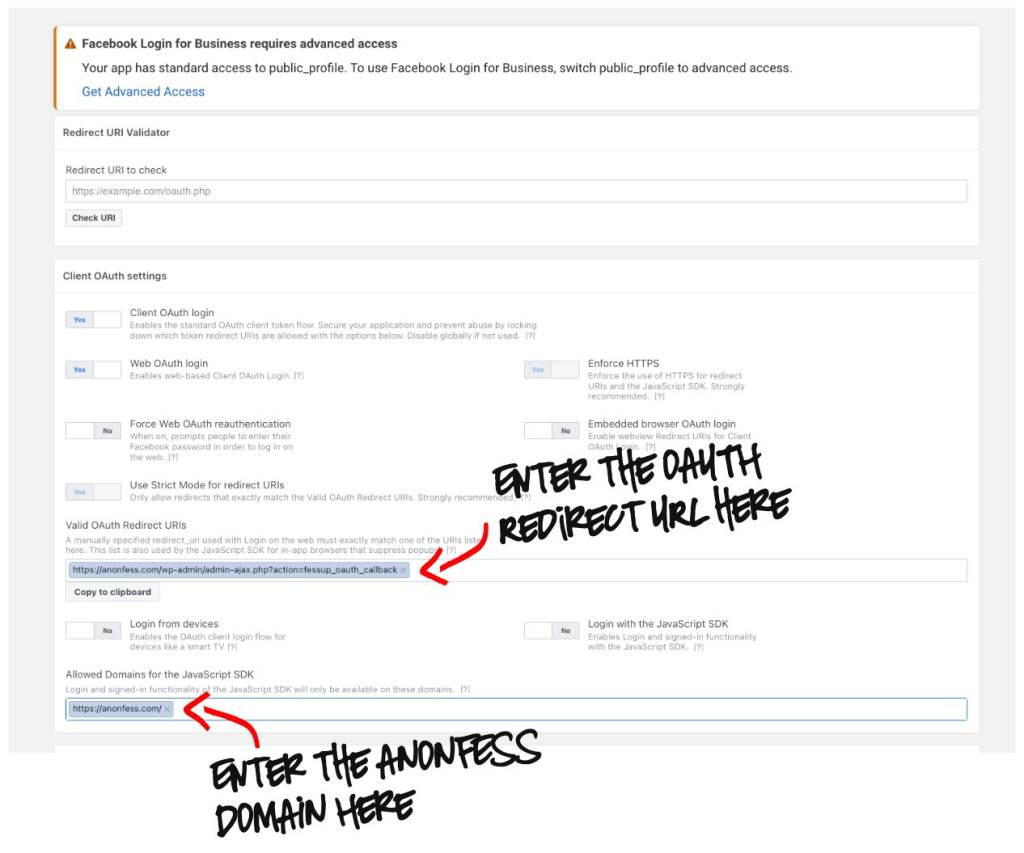
You can now check that the setup is correct by pasting the redirect URI (https://anonfess.com/wp-admin/admin-ajax.php?action=fessup_oauth_callback) into the Redirect URI Validator and clicking Check URI. It should tell you it is a valid redirect for this application.

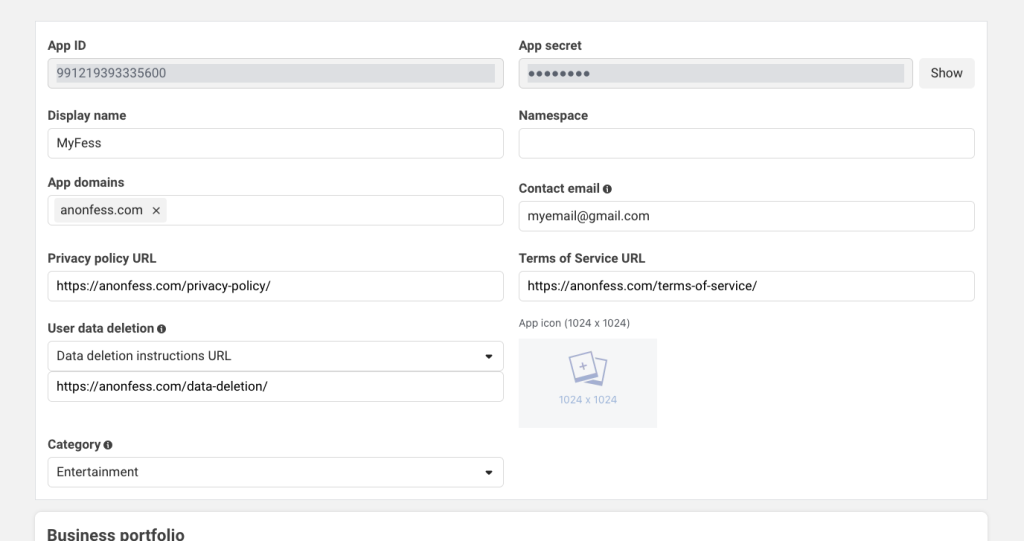
When that is done, click on App Settings then Basic in the sidebar. You’re going to enter some admin settings here. In App domains enter anonfess.com. For Privacy policy URL enter https://anonfess.com/privacy-policy/. For Terms of Service URL enter https://anonfess.com/terms-of-service/ and for User data deletion URL enter https://anonfess.com/data-deletion/. Select Category Entertainment from the dropdown then scroll down and click Save Changes.
After it’s saved, click Live on the App Mode toggle at the top of the screen to switch the app to live mode.

You can then copy the App ID and the App Secret (after clicking Show) from the Basic settings to paste into the AnonFess site.

Go back to your Confession Page Settings on anonfess.com and paste in these details:
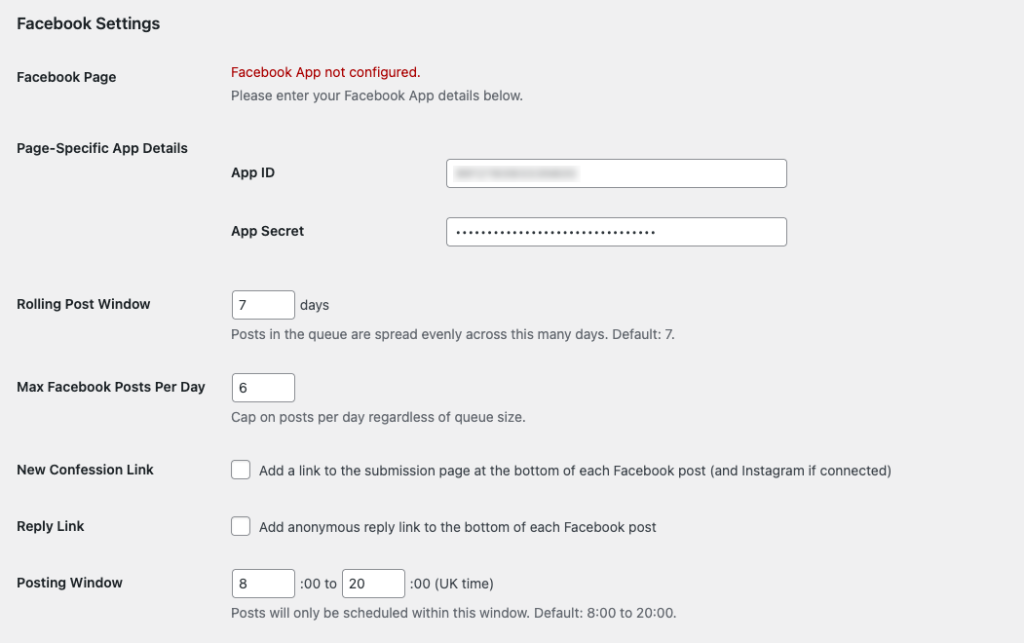
You can also set other Facebook settings at this point, including:
- The Rolling Post Window – all the approved posts in the submission queue will be posted to Facebook evenly over this time period. So for example, if you have 14 posts in the queue and the Rolling Post Window is 7 days, you will get 2 posted per day.
- The Max Facebook Posts Per Day – this ensures you don’t get too many posts per day if there have been lots of recent submissions.
- New Confession Link – if checked this adds a link to the AnonFess Submission page for your confession page so readers of a confession on Facebook can just click it to go straight to enter their own.
- Reply Link – if checked this adds a reply link to the confession which viewers can click to go to the AnonFess Submission page with the hashtag of the original post preloaded in the submission so it acts as a reply.
- The Posting Window – this sets the hours in the day during which posts are made.
You can initially just use the defaults – we will cover updating these settings in detail later. Scroll down and click Save Confession Page Settings.

After saving, the Connect to Facebook button should now be visible:
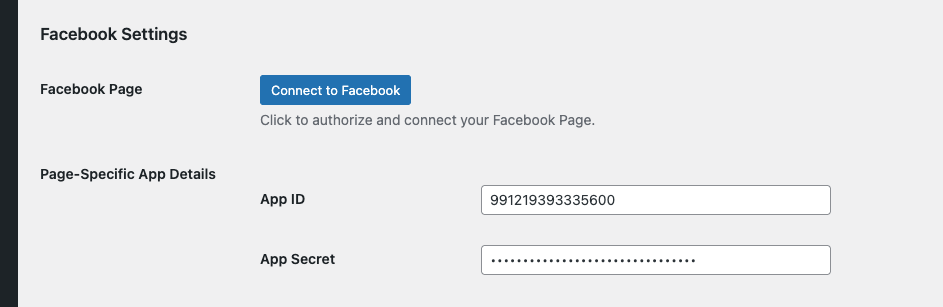
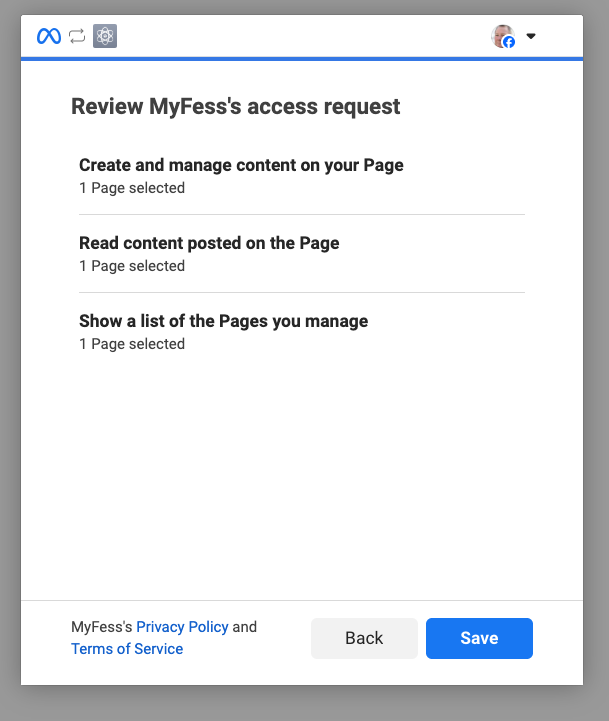
Click the button to go to Facebook to approve the connection to your page by selecting your confession page (if you have more than one page on your account) and approving the permissions to Create and manage content, Read content posted on the Page and Show a list of the Pages you manage. Click Save to approve.
It should now show your page as connected in the settings and you will be able to post any confessions to your page from the site either manually via the Post Now button on the Confessions dashboard or automatically via the schedule.
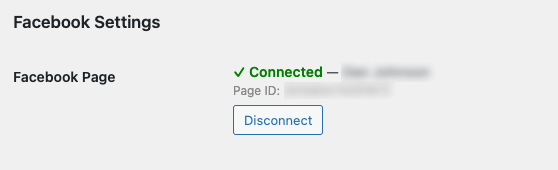
Once connected, Facebook will automatically extend access to the page as long as you keep posting. But if posts ever stop appearing, check this page and reconnect if needed.
Remember: You must be an admin of the Facebook Page to connect it.
4. Connecting Instagram (Optional)
Once you’ve connected to Facebook you will then get the option to connect to Instagram if you want. Instagram posting generates a custom image for each confession (text on a background) and publishes it to your Instagram Business account at the same time as the Facebook post.
Before you begin: – Your Instagram account must be set to Business type (not Personal or Creator) – It must be linked to your Facebook Page in Facebook’s settings.
To connect, simply click the Connect Instagram button and approve the permissions as before.
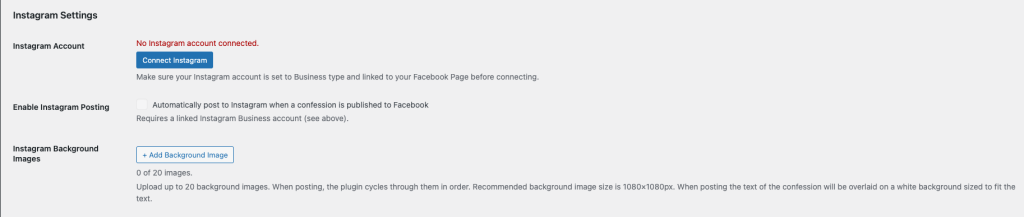
You can the check the box to enable Instagram Posting. That will then automatically post confessions to your Instagram page as well as Facebook.
The Instagram posts are made by superimposing the text of the confession onto a background image. You can upload up to 20 background images which are rotated through in turn. It’s usual to pick “iconic” images representative of your confession page that will grab attention on Instagram.
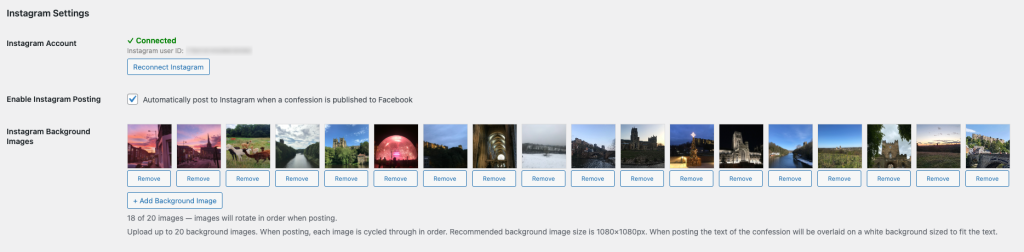
The text is also included in the Instagram caption. If the text is too big to fit on the image it’s trunctated to 200 characters.
If an image is uploaded by the user when makign their confession, that’s used instead of the text overlay.
5. Reviewing Pending Submissions
New confessions entered via the submissions page land in the Pending Review tab. You’ll see the confession text, the time it was submitted, and any attached image.
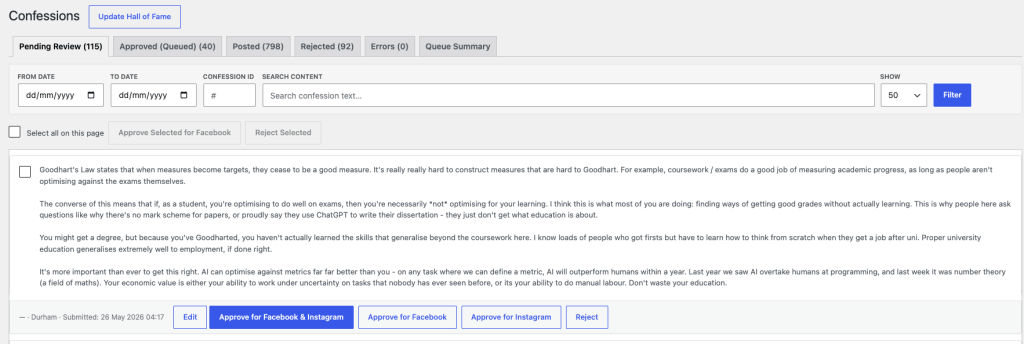
Actions available on each confession:
| Action | What it does |
|---|---|
| Approve | Moves the confession to the posting queue |
| Reject | Moves it to the Rejected tab (not posted, not deleted) |
| Edit | Lets you edit the text before approving — useful for removing identifying details or fixing typos |
| Move Page | If you manage more than one confessions page, moves this submission to a different page’s queue |
Filtering and searching: – Filter by date range or search by keyword or confession id (the hashtag number like 40248 in #Durfess40248) using the controls at the top of the tab – Use the per-page selector to show more confessions at once (50 / 100 / 250 / 500)
Content warnings: Some submissions may trigger a warning flag (e.g. mental health references). These are flagged automatically and the submitter is asked to confirm before sending. You’ll see a note on the confession if this happened.
6. Managing the Posting Queue
The Approved (Queued) tab shows confessions waiting to be posted. They post automatically based on your schedule — but you have full control over the order and timing.
Reordering: Use the Move to Top / Up / Down / Bottom buttons next to each confession to adjust the order.
Posting manually: Click Post Now on any confession to publish it to Facebook (and Instagram if enabled) immediately, bypassing the schedule.
Returning to review: If you change your mind about an approved confession, click Return to Pending to move it back to the Pending Review tab.
Estimated posting time: Each queued confession shows an estimated posting time based on its position in the queue and your current schedule settings.
7. Posting Schedule Settings
Go to the Queue Summary tab to control how quickly confessions are posted. These settings can also be adjusted in the Confession Page settings.
| Setting | Default | Description |
|---|---|---|
| Posting window start | 8am | Earliest hour confessions can be posted (UK time) |
| Posting window end | 8pm | Latest hour confessions can be posted (UK time) |
| Max posts per day | 6 | Hard cap on daily posts |
| Rolling window (days) | 7 | Target days to clear the current queue — the system adjusts the daily rate to work through the backlog within this window |
The system checks the queue every 5 minutes and posts when the timing and daily limits allow. If the queue is large, the daily rate increases automatically (up to the max) to clear it within the rolling window.
8. Deleting Posts
From the Posted tab, each confession has two removal options:
Delete & Review – Deletes the post from Facebook – Returns the confession to Pending Review so you can edit it and re-approve it if needed – If the confession was also posted to Instagram, a note will appear — Instagram does not support automatic deletion, so you’ll need to delete that post manually from the Instagram by clicking the link in the note to go to the post.
Delete Permanently – Deletes the post from Facebook and permanently removes the confession from the AnonFess system — this cannot be undone. A confirmation prompt appears before this action completes.
9. Errors
Very occasionally Facebook or Instagram will report an error when trying to post a confession. Posts that trigger these errors are moved into the Errors tab. Nothing is lost — it’s held safely so you can deal with it.
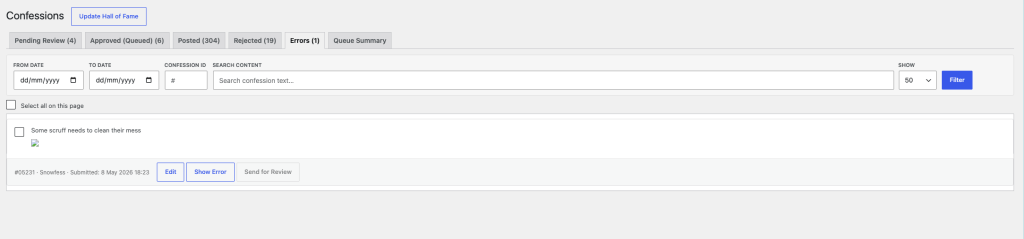
For each errored confession you can:
- Show Error — reveals the exact message Facebook or Instagram returned. This usually tells you what went wrong.
- Edit — fix the confession text if the content was the problem.
- Send for Review — puts the confession back into Pending Review so it can be approved and posted again.
Common causes of a failed post:
- Your Facebook connection has expired. Reconnect your Facebook Page in Confession Page Settings.
- Your Facebook App isn’t in Live mode. Posts only go out when the app is switched to Live.
- Instagram isn’t set up correctly. The linked account must be a Business account connected to your Facebook Page.
- An image couldn’t be loaded. If the confession has an attached image, the image host may have been briefly unavailable — Send for Review and try again – or try deleting the image.
If a post keeps failing after you’ve checked all of the above, contact us and we’ll take a look.
10. Hall of Fame
The Hall of Fame is a public page on your confessions website showing the most-reacted confessions. Reactions are fetched from Facebook daily and used to rank posts.
Visitors can filter by time period: – All time – Last year – Last 3 months – Last month – Last week
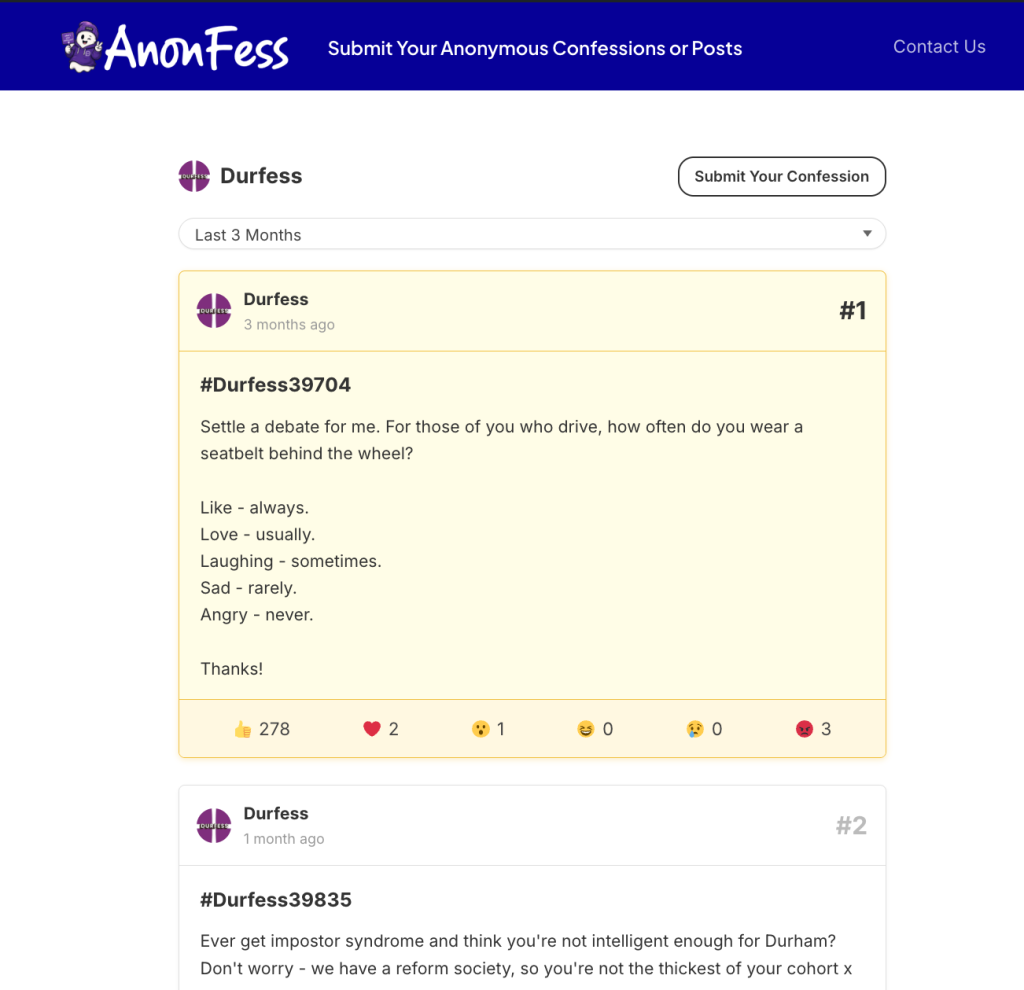
You can force a reaction update at any time by clicking Update Hall of Fame in your settings.
11. Rebuild your old Hall of Fame
If your Facebook page used to use a different Confessions tool and you built up a Hall of Fame with lots of popular confessions you can recover those popular posts.
At the very bottom of your Confession Page Settings you’ll see an option to rebuild your Hall of Fame. Select how many posts you want to recover – the top 10, 25, 50 or 100 and click Start Scan and Import.
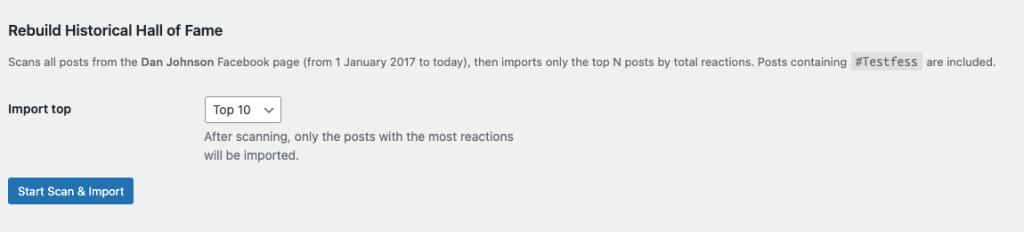
This will scan your Facebook page for posts with your confession hashtag (e.g. #Durfessxxxxx). This may take some time if you have a lot of posts dating back many years.
It will then identify the top posts by reaction numbers and give you the option to import them if the posts aren’t already live on Anonfess. Any imported posts will go into your current Hall of Fame page.
12. Managing Additional Admins
As the master admin for your page (ie the person who set the page up), you can add other people as admins to help review confessions.
- Go to Confession Page Settings
- Scroll to the Admins section
- You can either:
- Invite by email — sends the person a unique link to register as an admin for your page
- Add an existing user — if someone already has an account on AnonFess, assign them directly
Additional admins can review and manage confessions but cannot change page settings or connect social accounts — those controls remain with the master admin.
13. Additional Settings
There are a number of additional settings you can adjust on the Confession Page Settings to improve the experience for your users:
Submission help text

You can add your own guidance below the confession form — house rules, a reminder to keep things kind, a note about what won’t get published. Set it in the Submission Help Text box in Confession Page Settings and it appears directly under the form on your submission page.
Numbering your confessions

Every confession is published with a number which works along with the page name as a hashtag for searching/linking on Facebook — #Durfess40244, #Durfess40245 and so on. The Next Post Number field sets where the count carries on from. Enter 100 and the next confession posts as #{page name}00100.
This is mainly useful when you’re moving an existing page over to AnonFess and want the numbering to pick up where your old page left off, rather than starting again from one.
Adding the submission date and time and New Confession/Reply Links

If you’d like each confession to show when it was sent in, tick Add Submission Date/Time. The date and time the confession was submitted are added to the end of the confession text when it’s posted.
You choose:
- Date format —
DD/MM/YYYYorMM/DD/YYYY. - Timezone — so the time shown matches your audience.
You can also add one or two links to the bottom of every post. Both are optional and off until you turn them on.
New Confession Link — adds an invitation to submit, so readers can post their own confession straight from your feed:
- On Facebook: “Post your own anonymous confession here:” followed by your submission page link.
- On Instagram: “Submit your Anonymous Confession: link in bio” (Instagram doesn’t allow clickable links in captions, so the text refers to the page bio and you’ll need to add the link to your confession page there).
Reply Link — adds a reply link so readers can respond to a specific confession:
- On Facebook: “Reply Anonymously:” followed by a link that opens your submission page pre-set to reply to that exact confession.
If you switch both on, the reply link is labelled “Or Reply” so the two read naturally together.
Alert banner
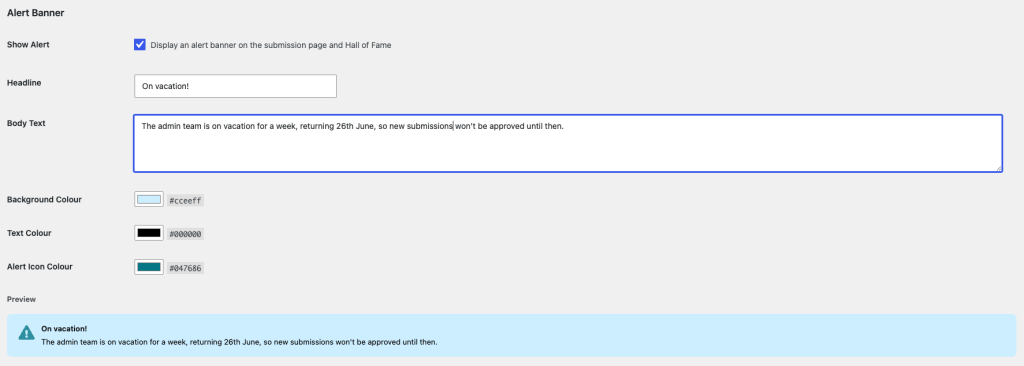
Need to tell visitors something important — a closure over the holidays, a change to posting times, a safeguarding notice? Turn on the Alert Banner.
The banner appears at the top of both your submission page and your Hall of Fame. You control:
- Headline and body text
- Background, text and icon colours — with a live preview as you edit, so you can see exactly how it’ll look before saving.
Leave it switched off when you don’t need it. Switch it on only while the message is relevant, then turn it off again.
Posting window (the hours posts go out)
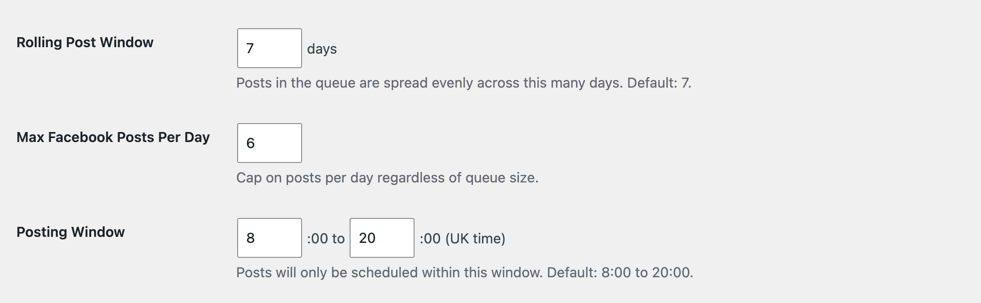
As well as the daily limit and the rolling window, you can set the hours of the day your posts are allowed to go out. By default that’s 08:00 to 20:00 UK time — nothing posts overnight.
Adjust the start and end hours to match when your audience is actually online. Posts are spread evenly across this window through the day. This can also be edited via the Queue Summary tab in the Confessions list.
14. Filters, Content Flags and Warnings
In addition to flags there are other automatic filters that happen before a confession reaches you, so you’re not the “first line of defence”. These filters help ensure a positive environment for you and the readers of your page, and ensure that posts that might get flagged by Facebook are removed at source.
Swearing is automatically masked
Common swear words are automatically censored the moment a confession is submitted — f**k, s**t and so on. The first and last letters stay; the middle becomes asterisks. By the time a confession reaches your queue, the strong language is already softened. You can still edit it further if you want to.
Explicit images are blocked at the door
If someone tries to attach an explicit image, it’s checked in their own browser before it’s ever sent. Pornographic or similarly explicit images are rejected with the message “This image has been blocked. Please choose an appropriate image,” and the form won’t submit until the image is removed. These images never reach your server or your queue.
This isn’t perfect — it catches clearly explicit images, not every borderline case — so you should still review images in Pending Review. But it stops the worst of it automatically.
Flagged topics show a warning
Flags are keywords or phrases that trigger a warning message to the submitter before they can send a confession. Two default flags are set up for all pages:
- Mental Health — detects references to self-harm, suicide, or crisis, and shows a supportive message with resources
- Potential Facebook Bans — detects language that could get posts removed by Facebook’s moderation
You can add your own custom flags in Confession Page Settings → Flags. Each flag has:
- A list of trigger words or phrases
- A custom warning message shown to the submitter
Flags do not block submissions — they just ask the user to confirm before sending. You’ll also be notified when you see the submission in the queue.
Spam protection
A couple of quiet protections run in the background:
- A hidden anti-spam check rejects automated bot submissions.
- Submissions are rate-limited per person, so no single visitor can flood your queue. If someone submits several confessions in quick succession, they’re asked to wait before sending more.
Neither of these needs anything from you — they just work.
In short
By the time a confession reaches your Pending Review queue, it has already been stripped of strong language, screened for explicit images, and protected against spam. Your job is the human judgement: deciding what’s worth publishing. Everything below that line is handled for you.
If you ever see something get through that shouldn’t have, contact us — it helps us tighten the filters.